**second post today**
Last but not least! Pacific Point, Tangerine Tango, Pink Pirouette, Bravo Burgundy, and Elegant Eggplant are now available for free download for My Digital Studio. Keep your My Digital Studio card stock collection complete and up-to-date by downloading these five favorites today!
Click here to download: http://www.stampinup.com/us/enu/16011.asp
Tuesday, August 31, 2010
BAB Onesie
Hi Stampers,

Just a reminder today is the final day to order from the Summer Mini catalog, which means TOMORROW the holiday mini goes LIVE!!! Remember you can shop 24/7 at http://www.georgiacaulkins.stampinup.net/.
***
You love Build-A-Bear Workshop; now you can create your own Build-A-Bear Workshop bears to use on scrapbooks, birthday cards, party invitations, and more!
Just like you can personalize a plush Build-A-Bear teddy bear, you can customize and personalize your die-cut bear using the colors and materials you want. Use Stampin’ Up!’s exclusive Bear Bigz die to create your basic bear, and then let your imagination run free!
I know I've showed you some Build-a-Bear onesies before, but I just had to share this one with you too.

For this Onesie I used the Big Shot, Bear Stampin' Up! Bigz Die and the new Beary Dressy Originals Die.
Let me know if you have any questions. . . thanks for stopping by!
Georgia
Monday, August 30, 2010
FREE Greenhouse Gala Craft Tote
**second post today**
I am excited to announce September's recruiting promotion, where new Stampin' Up! demonstrators will receive a FREE Greenhouse Gala Craft Tote (a $39.95 value) with their Starter Kit!

I am excited to announce September's recruiting promotion, where new Stampin' Up! demonstrators will receive a FREE Greenhouse Gala Craft Tote (a $39.95 value) with their Starter Kit!

Contact me at Georgia@mustainlaw.com for more details!
Jar Toppers
Hi Stampers,

Paper: Whisper White Card Stock; Autumn Spice Designer Series Paper
Ink: Cajun Craze Classic Stampin' Pad; Old Olive Classic Stampin' Pad
Accessories & Tools: Linen thread; Stampin' Dimensionals; Big Shot; Scallop Circle Bigz Die; Batting; Honey, granola, apricot preserves; Jars; Spray bottle with water
Instructions
Yesterday we talked about giving a gift basket to a friend and today I'd like to share with you an idea to put in the gift basket. It's a jar topper perfect to make and put on that jelly you just whipped up. :o)
Supplies and Directions are below. . . Thanks for stopping by today!
Georgia

Stamps: Day of Gratitude Set
Paper: Whisper White Card Stock; Autumn Spice Designer Series Paper
Ink: Cajun Craze Classic Stampin' Pad; Old Olive Classic Stampin' Pad
Accessories & Tools: Linen thread; Stampin' Dimensionals; Big Shot; Scallop Circle Bigz Die; Batting; Honey, granola, apricot preserves; Jars; Spray bottle with water
Instructions
- Cut scallop circles from Autumn Spice Designer Series Paper using Big Shot and Scallop Circle Bigz Die.
- Spray scallop circles with water. Place a little bit of batting on top of each jar, then mold scallop circle to top of jar over batting. Secure with Linen Thread, and allow to dry.
- Stamp "Thank you" three times in Old Olive ink on Whisper White Card Stock. Cut in banner shape.
- Stamp acorn image three times in Cajun Craze ink on Whisper White Card Stock. Cut out, and adhere one to each jar along with "Thank you" banner.
Sunday, August 29, 2010
Gratitude Card (4" x 4")
Hi Stampers,

Paper: Old Olive Card Stock; Whisper White Card Stock
Instructions
Today I'd like to share with you another sample from the magazine Stampin' Up! sent me. This is a little 4"x4" card perfect to stick in a gift basket for a special friend or neighbor.
Once again all of the supplies and directions are listed below.
Enjoy your day!
Georgia

Stamps: Day of Gratitude Set
Paper: Old Olive Card Stock; Whisper White Card Stock
Ink: Cajun Craze Classic Stampin' Pad; Early Espresso Classic Stampin' Pad; Old Olive Classic Stampin' Pad
Accessories & Tools: Stampin' Dimensionals; Big Shot; Petals-a-Plenty Textured Impressions Embossing Folder; Sponge Daubers
Instructions
- Emboss Old Olive Card Stock using Big Shot and Petals-a-Plenty Textured Impressions Embossing Folder. Cut, and adhere to front of Old Olive card.
- Stamp "Gratitude" message in Old Olive ink on card.
- Stamp medallion image in Old Olive ink, leaf in Cajun Craze ink, and acorn in Early Espresso ink on Whisper White Card Stock. Sponge Old Olive ink over medallion and Cajun Craze ink over leaf and acorn. Cut out, and adhere medallion and leaf to card using Stampin' Dimensionals. Adhere acorn to medallion and leaf.
Saturday, August 28, 2010
Sunflowers
Hi Stampers,
Thanks for stoppping by!
Georgia

Ink: So Saffron Stampin' Write Marker
Instructions
Today I'd like to share with you some sunflowers that were in the last magazine I got from Stampin' Up! Stampin' Up! sends every demonstrator a FREE magazine each month packed full of ideas. All of the supplies and directions are listed below the picture.
Thanks for stoppping by!
Georgia

Paper: So Saffron Card Stock; Early Espresso Textured Card Stock; Autumn Spice Designer Series Paper
Ink: So Saffron Stampin' Write Marker
Accessories & Tools: Early Espresso 1/4" Grosgrain Ribbon; Linen Thread; Neutrals Designer Buttons; Stampin' Dimensionals; Circle Scissor Plus; Color Spritzer Tool; Itty Bitty Shapes Punch Pack; Big Shot; Scallop Circle Bigz Die; Scallop Circle #2 Bigz Die; Leaves #2 Originals Die; Floral wire; Hot glue gun and glue; Small pitcher; Sunflower seeds
Instructions
- Cut scallop circles from So Saffron Card Stock and Autumn Spice Designer Series Paper using Big Shot, Scallop Circle Bigz Die, and Scallop Circle #2 Bigz Die.
- Cut between scallops on die-cut scallop circles to create flower petals. To create each sunflower, layer three circles; place floral wire between two of the layers, and adhere layers together using hot glue.
- Spritz flowers using Color Spritzer Tool and So Saffron Stampin' Write Marker.
- For center of smaller flower, cut a circle from Sticky Pages the size of the flower center and adhere to separate piece of card stock or paper. Begin twisting ribbon, and adhere end to center of sticky circle. Continue twisting and adhering ribbon to sticky circle in tight outward spiral. When you reach the outer edge of the circle, cut off remaining ribbon except for a small tail. Tuck tail inside or adhere to back of circle. Trim card stock or paper to size of ribbon spiral, and adhere to flower center.
- For center of large flower, cut a circle from Early Espresso Textured Card Stock to the desired size using Circle Scissor Plus. Punch multiple small circles from Early Espresso Textured Card Stock using Itty Bitty Shapes Punch Pack. Adhere small circles to large circle, using Stampin' Dimensionals for outside and inside rows. Tie Linen Thread through Early Espresso Designer Button, and adhere to center of Early Espresso Circle. Adhere circle to flower center.
- Cut leaves from Autumn Spice Designer Series Paper using Big Shot and Leaves #2 Originals Die. Adhere two leaves to each flower stem.
- Fill bottom of small pitcher with sunflower seeds. Place flowers in pitcher.
Friday, August 27, 2010
Word Play
Hi Stampers,

It's Friday!!! AND . . . it's also my dad's birthday today. He's coming over to celebrate tonight. The plan today is for Blake and I to bake him a cake. . . and stamp him a card. I love to have Blake help do things like this. :o)
Today I'd like to share with you a card using the Word Play stamp set. . . if you search my blog for Word Play you'll find lots of card samples, as I made one card using each of the 12 stamps from this set.
I shared this card with you before, but I always thought it was missing something, so I decided to add a little ribbon and that really changed the look.

What do you think?
Let me know if you have any questions, and enjoy your weekend!
Happy Stamping!
Georgia
Thursday, August 26, 2010
A Day out with Thomas
Hi Stampers,
This first page is the cover of my album.


So this past weekend my family spent in Chicagoland. . . we went to Legoland, saw Thomas the Train and did lots of shopping!!! It's funny how Rocky bought LOTS more than I did. . . I'm so lucky he loves to shop. However, he likes to shop at The Bass Pro Shop and Cabelas.
Today I'd like to share a couple of scrapbook pages I made using My Digital Studio from Stampin' Up!
My Digital Studio is priced at $79.95 and worth every penny. Not only can you use the same great artwork, colors, and accessory images found in our current product line to create personalized digital projects. The options are endless: create photo albums, calendars, and greeting cards using My Digital Studio. Once you've created your personalized gift or heirloom, have it printed in our high-quality print facility and delivered to your door or print it at home.
This first page is the cover of my album.

And this second picture is a page from my album.

My Digital Studio is an awesome way to scrapbook. I'm thinking about doing a bunch of albums and saving them as DVDs for my children to watch in the years to come.
Let me know if you have any questions, and thanks for stopping by!
Georgia
Wednesday, August 25, 2010
Easter ~ Build-a-Bear
Hi Stampers,
I know Easter is a LONG way off, but I'd like to share with you this Build-a-Bear "framed art" Easter bear. With being pregnant I didn't have the time (or energy) to have a mom and me class using the Easter die for the bears.
I really wanted to have a sample at the stamp fair, so I got out my dies and big shot and, "went to town"!

As with all of my framed art projects I like to keep the layout simple an easy. Don't you just love those ears!!!
When you would with Build-a-bears a liquid glue is a MUST!!! I like to use Stampin' Up! tombo multi purpose adhesive.
Let me know if you have questions!
Thanks for stopping!
Georgia
Tuesday, August 24, 2010
Punch Caddies Not Available
As you know, the Punch Caddy is listed in the new Idea Book & Catalog (pg. 200) as “Coming soon.” We are disappointed to report, however, that due to serious production and quality issues with the manufacturer, we will not be able to offer the Punch Caddies at all. And because the manufacturer will likely not be able to meet our quality standards for the Punch Caddy in the future, we do not have any plans to offer a revised or equivalent product in its place.
We, like you, are disappointed that we cannot offer the Punch Caddies for sale. But because of our ongoing commitment to providing you with the highest quality products, we simply cannot allow this product to go live.
Stamp Fair ~ 3D project
Hi Stampers,
So last weekend Rocky and I took the kids to Union, IL to see and ride on Thomas the Train!!! While Callie Ann won't remember it and slept through much of it, Blake had a blast!!! This is the second year we've made the trip to see Thomas. You can bet I have a ton of pictures to share with you. But until I have time to pull a few I'd like to share with you the 3D project we made at the Stamp Fair.

Stampers got to make this box and three cards with envelopes using the Big Shot and the Bitty Box & Envelope Stampin' Up! Bigz Xl Die. The In Colors used are Pear Pizzazz, Concord Crush and Peach Parfait. The stamp set is Silhouette Sentiments.
It’s amazing how easy it is to create an elegant card with a simple silhouette image and sincere sentiment. With images perfectly sized for small notecards, our Silhouette Sentiments set will have you creating gorgeous greetings in no time. These images are also perfect for adding graceful details to smaller accents, such as punched shapes, for scrapbook pages and other projects. Available both in wood-mount and clear-mount.
If you have any questions, please ask!
Thanks for stopping by!
Georgia
Monday, August 23, 2010
Stamp Fair Project #2
Hi Stampers,
Today I'd like to share with you the second card we made at the Stamp Fair.

We used the heart punch to punch a heart in the designer paper and layered it over the stamped image. The picking heart boarder punch was used to add a few more hearts to this card.
Wouldn't you just love to receive this thank you card in the mail . . . who knows . . . maybe you will? :o)
Thanks for stopping by!
Georgia
Sunday, August 22, 2010
Birthday Bakery
Hi Stampers,
Today's share is another card club members stamped this month. Don't you just love the simpleness of the card?

With a whole host of delectable bakery delights, our Birthday Bakery set provides mouthwatering images and messages as sweet as icing for all of your birthday cards, favors, and other party needs. When it comes to getting all the attention, these beautifully decorated cakes will give the actual birthday cake a run for its money. Available both in wood-mount and clear-mount. Also available in Spanish and in French.
For this card all you need is Whisper White card stock, Tempting Turquoise card stock, Basic Black Ink Pad, Tempting Turquoise Marker, White Gel Pen and the Scallop boarder punch. The stamp set is Birthday Bakery, which is a level one hostess stamp set.
If you'd like to get this stamp set all you have to do is have a party! Let me know if you are interested.
Thanks for stopping by!
Georgia
If you'd like to get this stamp set all you have to do is have a party! Let me know if you are interested.
Thanks for stopping by!
Georgia
Saturday, August 21, 2010
Stamp Fair Sample #1
Hi Stampers,
So last Saturday was the Stamp Fair and we had such a groovy time. :o) Today I'd like to share with you one of the cards stampers got to make.
The first step to make this card is to rub the Whisper White craft pad onto the base card stock and let it dry.
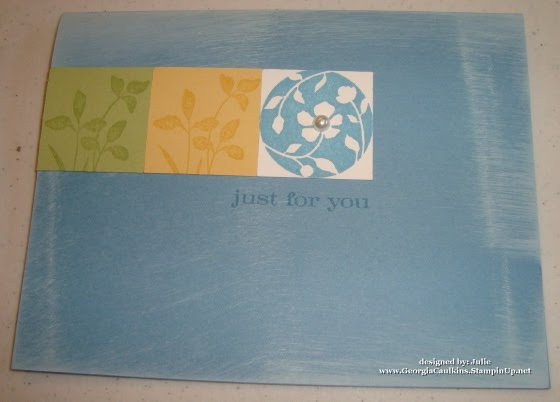
Then using matching ink pads we stamped the images from the Just Believe stamp set. After stamping we punched out the squares and lined them up.
If you look close you will see a pearl in the circle.
I hope you enjoyed this project and I hope you enjoyed making the card last weekend even more!
Thanks for stopping by!
Georgia
Friday, August 20, 2010
Awash with Flowers
Hi Stampers,
It's Saturday!!! I'm so excited that it's the weekend!!! We are going to go and see Thomas the Train today!!! This is the second year that we have taken a road trip to see and ride on Thomas.
Today I'd like to share with you a card that I received in the mail for my birthday a couple of weeks ago. My friend, and downline member, Britni sent me this card.

For this card Britni got out her Big Shot to cut the Whisper White card stock and used the Eyelet Boarder Punch along the card stock. As the card sample yester the flowers came from the Awash with Flowers stamp set.
Enjoy your Saturday and Thanks for stopping!
Georgia
shop 24/7 @ http://www.georgiacaulkins.stampinup.net/
Thursday, August 19, 2010
All in the family meets Awash with Flowers
Hi Stampers,
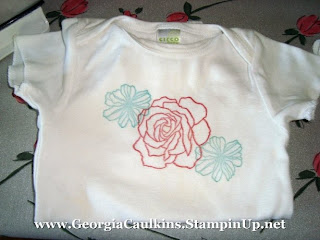
I'm very excited to share with you today a card that uses the All in the Family stamp set and Awash with Flowers.
I think it's so cute to turn the flowers "upside down" and add a head to each one. I was inspired by both a fellow stamper, and a convention swap my upline brought back from Utah.

I used Crystal Effects and Dazzling Diamonds to add a little "bling" to the dresses.
Colors used are Melon Mambo, Basic Black and Daffodil Delight. I also used the Blush Blossom marker to color in the faces.
If you have any questions, please ask!
Thanks for stopping by!
Georgia
Wednesday, August 18, 2010
On The Green
Hi Stampers,

Today I'd like to share with you a sample that uses the stamp, On The Green. This was another card that club members got to make last week. If you are interested in one of my card clubs new clubs will be starting in January. . . I hope you will join me. :o)
Celebrate the golfers in your life with the On the Green stamp. Use it on birthday cards, gifts, scrapbook pages, and more. It's chock-full of golfing images and sentiments--use them together as shown, or ink a portion of the stamp to use just one image. Since Rocky is a golfer I just knew I wanted to get this stamp.

To get the Wild Wasabi golfer I first inked the stamp in Chocolate Chip. I then used an blender pen to remove the ink from the golfer. Next I used my Wild Wasabi marker to make the golfer green.
The Wild Wasabi card stock was ran though the Big Shot using the Perfect Polka-dot embossing folder.
If you have any questions, please ask!
Thanks for stopping by!
Georgia
Tuesday, August 17, 2010
Extreme Dirt Bike
Hi Stampers,
Today I'd love to share with you a card club members stamped last week. It uses the Extreme Dirt Bike stamp (115175 Price: $8.95). Flips and tricks can be hard to master on a bike, but with the Extreme Dirt Bike image, you can make a perfect landing every time!

For this card I used Old Olive, Whisper White and Basic Black. The image was stamped in versamark and then embossed with black embossing powder. I punched the black with the spiral punch then tied a little hemp twine around it. Birthday Wishes is from the hostess set, Occasional Quotes.
Let me know if you have any questions!
Thanks for stopping.
Georgia
Monday, August 16, 2010
Onesies
Hi Stampers,

Today I have two more onesies to share with you. . . these onesies were stamped on with craft ink! I used my Stamp-a-ma-jig to stamp multipule times so that the image was nice and dark.
Let me know what you think of the onesies (both today's share and yesterday). . . thanks!


Don't you like the pink lion?
Thanks for stopping by and enjoy your day!
Georgia
Sunday, August 15, 2010
Build-a-Bear Onesies & Stamp Fair
 Hi Stampers,
Don't you just love the Build-a-Bear dies!!! I think they rock and now that I have a girl I am really having lots of fun with making little girl bears. :o)
As you know yesterday was the stamp fair I have been talking about it for a month or so. The groovy theme was so much fun. . . here are a few pictures. I didn't get as many as I had liked, but I do have a few to share.

Here I am in my groovy outfit. . . to decorate my apron I used the pennant die and some groovy material. . . and see that Onesie I'm holding. . . I made that using my Build-a-Bear dies and Big Shot I had a lot of fun making some onesies to have on display.
Here's a close up of the bear.

But wait . . . I have a couple more to share with you today. With Halloween just around the corner I made a onesie for Callie Ann to wear. . . now I need to make another bear and put it on a shirt, as Blake wants one too. :o)


And this last onesie is the one I am the most excited about. . . I used the pennant die to make a "skirt" around the bottom. I can't wait to get Callie Ann in this onesie. However, it will be a few months as it was a 9 month onesie.

I really LOVE this die . . . don't you?

Thanks for stopping by today and enjoy your Sunday!
Georgia
BTW - here are a couple of pictures of the demonstrations.


Saturday, August 14, 2010
Word Play 11 & 12
Hi Stampers . . .
It's stamp fair day and I am looking forward to seeing many of you very soon!!!


It's stamp fair day and I am looking forward to seeing many of you very soon!!!
I have LOTS of new samples to share with you today and I can't wait to see your response to my Build-a-Bear projects. I'll share them on my blog soon, as I wanted to get instant feedback when I share them with people for the first time. :o)
Since today is special (stamp fair day!) I'd like to share with you not one, but the final two Word Play cards. . . . get excited!!!

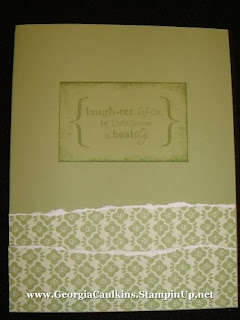
I'm really loving the new embossing folder I got. It makes such deep impressions in the card stock!
And this last card is VERY SIMPLE...the DSP is just torn and the laughter is popped up with a stampin dimensional.
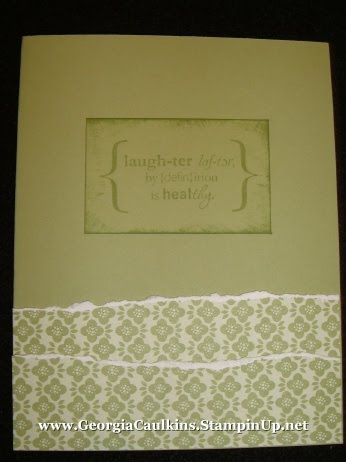
Of course you can bet I'll share more cards using this stamp set in the future as I hope Word Play will be around for a few years. In fact below is a revised version of a prior card I shared with you. I decided punch some white card stock and add to the project in place of the white strip. Click HERE to see the first card.

Happy Stamping!
Georgia
p.s. You don't need to wait until 4am to read today's post as I posted it automatically since I was still up and it's now STAMP FAIR DAY!!! Can you tell I'm excited? I better get to bed, so I can get up and stamp! It's gonna be a fun day.
Friday, August 13, 2010
Word Play #10
Hi Stampers,

Do you know what today is??? It's FRIDAY THE 13TH!!! Watch out for black cats! :o)
Well I am almost done sharing my 12 Word Play samples with you. I have them all done and if you are coming to the Stamp Fair tomorrow make sure to check out my display board.
If you have not signed up for the fair yet. . . fear not! There is still room. Just let me know ASAP and I'll get you signed up.
The word play card today kinda makes me "sick" when I look at it for a long time. . . . I think it's a mixture of the colors and the card stock strips in the back.

I think the stamp says it all. . . don't you?
Thanks for stopping by and I look forward to seeing some of you at the Stamp Fair tomorrow! Make sure to tell me hi and don't forget your groovy clothes!
Happy Stamping!
Georgia
Thursday, August 12, 2010
Cindy's Purse!
Hi Stampers,

I am so very excited today to share with you a Rag Quilt Purse my friend Cindy made. Cindy came to my Rag Quilt Class earlier this year and had been cranking out purses ever since! I am so proud of her. :o)
Here is Cindy's latest purse she is using.

I just LOVE how she put some demin with regular fabric. I'm gonna CASE her for sure!
Thanks for stopping by!
Georgia
Wednesday, August 11, 2010
Build-a-Bear Clock
Hi Stampers,
.JPG)
.JPG)

Last night was card club and I was so excited to have a full house of ladies stamping! Blake was good (for the most part) with some help from Amanda to keep him busy in the toy room. I hope you all had lots of fun!!!
After everyone left I had a few hours to play in my stamp room, before I got ready for bed. . . . while making samples for the Stamp Fair on Saturday I decided to pull out my Build-a-Bear dies and made a clock to put in Callie Ann's room.
Before I share the clock picture with you I wanted to share a picture of Callie Ann. She's two months now and this outfit screams Stampin' Up! Don't you think?
.JPG)
I can't wait until Callie Ann gets into Stampin' Up! :o)
OK . . now I'm sure you'd like to see the new clock for Callie Ann's room. . . right???
.JPG)
It was very simple to make. . . . I just "built" a bear and attached it to the glass using Mini Glue Dots.
Here's a close up of the bear.

Thanks for stopping by today and make sure to check out this clock in person at the Stamp Fair. I will have it along with lots more build-a-bear samples.
~ Georgia
Tuesday, August 10, 2010
Just Believe
Hi Stampers!

Last night some of the demonstrators helping with the Stamp Fair came over to talk "shop" . . . and I got to see 3 of the 4 make and take projects. You are going to have SO MUCH FUN stamping them and also recreating them at home. You see they are wonderful cards that you will have fun making over and over. Remember you can still sign up for the fair. . . just let me know ASAP which session you'd like to attend. Click HERE for those details.
Today I'd like to share with you a card club members get to stamp. It uses the stamp set, Just Believe, which is also a stamp set you will be using at the Stamp Fair on Saturday.

This is my second card I made using this set. Click HERE for the other sample and to see, and learn, more about the Just Believe stamp set.
Thanks for stopping by!
Georgia
Monday, August 9, 2010
Word Play #9
Hi Stampers,
WOW . . . August 9th finds me way behind! I haven't even gotten my August newsletter out this month! Fear not. . . it is coming soon!!!
Don't forget CARD CLUBS are THIS WEEK!!! I'm looking forward to stamping with many of you very soon! ALSO the STAMP FAIR is THIS SATURDAY!!! There is still time to register for this groovy event!!! Let me know ASAP if you are able to attend.
OK . . . enough talk! :o) Today I'd like to share with you the 9th card sample using Word Play. Remember there are 12 stamps in this set, so you will only need to hear me talk about it 3 more times! That is once I get cards stamped with the last three stamps. :o)

Todays' card is quick and simple. . . what do you think?
Thanks for stopping by today . . . I'd "talk" longer but we were at the lake all weekend, and I'm just to tired as I set here Sunday night typing my blog . . . it's 11pm and I still have a few things to do before I can call it a night.
Have a good one!
Georgia
Sunday, August 8, 2010
Snowman Punch Art and 8th Word Play Card
Hi Stampers,
Has it been hot enough for you this weekend? I think so too. . . . so today I'd like to share the snowman I made last week. It uses lots of punches. Isn't he cute! :o)

And as you can guess I used the stamp set, Word Play! How do you like my card? I cased the snowman from a card I saw on SplitCoastStampers.

Let me know if you have any questions!
- Georgia
BTW - Card Clubs are THIS WEEK!
Saturday, August 7, 2010
Oval Labels Chalkboard Décor Elements
Hi Stampers,
Have you seen tried the Chalkboard Décor Elements yet? I have one in my kitchen and I love it. Now I just got the Oval Labels Chalkboard Décor Elements "up". These Oval Labels Chalkboard Décor Elements come in a pack of 3 (121019 Price: $5.95).

Our Labels Chalkboard Décor Elements appeal to everyone—adults and children alike—who are mesmerized by the ability to create something and then erase it and start all over again. They’re a unique and fun way to get children involved in organizing their spaces or labeling their things. And if things change, it’s easy. All it takes is a damp cloth to erase it and start all over again.
I put one of the ovals on a glass jar and put some stamps in it. I need to get some different chalk to use, because it's hard to write nice using Blake's Jumbo sidewalk chalk. :o)

What would you put in your jar?
Enjoy your Saturday!
Georgia
Friday, August 6, 2010
Word Play ~ 7th Card
Hi Stampers,
Happy Friday!!! Now that I'm back to work I look forward to Friday once again and spending time with the kids. :o) This week wasn't bad at all, because two of the five days I got to take Callie Ann with me to the office and Blake went to grandma's house as our sitter was closed.
Just a reminder . . . next Saturday is the Stamp Fair!!! There is still time to register for this event. . . just let me know.
As I mentioned before I will have my Word Play card samples there for you to look at in person. :o) For today's share I have the 7th card sample to share with you.

Do you like how I "tied" the ribbon on this card? It's a build-a-brad. I just wrapped it around the ribbon to hold in place.

Thanks for stopping by today and make sure to contact me if you'd like to come to the stamp fair next Saturday.
Have a GREAT weekend!
Georgia
Thursday, August 5, 2010
Word Play ~ 6th Card
Hi Stampers,
I'm very happy to share with you the 6th sample I made using Word Play! This means I am 1/2 way though sharing every stamp in this set with you! :o) I have been using other stamp sets too, so I'll put those samples in here and there too . . . this way you don't have a whole week of nothing but Word Play! :o)
The card today uses Wild Wasabi and Chocolate Chip Card Stock. I used the scallop bigz die and ran it through the big shot. Then I used the Perfect Polka-dot embossing folder on the card stock.

If you look close you'll notice that the actual "world" was punched out and attached with a Stampin' Dimensional. It's hard to see in the picture. If you come to the Stamp Fair on August 14th you'll beable to look at this card. It's not to late to register.
Talk to you soon!
Georgia
Wednesday, August 4, 2010
Word Play ~ Day 5
Hi Stampers,
I'm excited to share with you another card using Word Play. This stamp set has so many possibilities, just look at all of the images.

Today I'm going to show you a sample using the Thanks A Million stamp. I wanted to share this card with you today to Thank You for all of the birthday wishes I have received. Thanks!

The Thanks A Million was embossed using VersaMark and Black Embossing Powder.

I think this card would make a GREAT thank you card for a wedding . . . you could just change the card stock to match your wedding colors.
Let me know if you have any questions!
Thanks for stopping by!
Georgia
Tuesday, August 3, 2010
Summer Mini Albums Available
**Second Post**
Old Olive Polka Dot 6" x 6" Album (item 119833)
Blue Herringbone 6" x 6" Album (item 119834)
Thank you for your patience!
We have received inventory for the following "while supplies last" items from the Summer Mini, and they are available to purchase beginning today.
Old Olive Polka Dot 6" x 6" Album (item 119833)
Blue Herringbone 6" x 6" Album (item 119834)
Thank you for your patience!
Clear Block Storage Caddy
Hi Stampers,


■ Opens flat for easy access
■ Locks shut
■ Built-in handle makes it easy to carry
■ 8-1/16" x 10-5/8" x 1-13/16"

Happy Shopping and thanks for stopping by my blog today!

Today I am going to take a break from Word Play to share with you the NEW Clear Block Storage Caddy (120279 Price: $16.95) that I just got.

This compact storage caddy holds one of each size of our clear-mount blocks. The foam insert securely holds the blocks in place; an additional foam insert sits between the blocks to protect them when the caddy is closed. Below is a picture of my caddy all filled up! :o)

■ Locks shut
■ Built-in handle makes it easy to carry
■ 8-1/16" x 10-5/8" x 1-13/16"

Above is a picture of the caddy with the foam inserts still in place. You just pull one out and replace it with you clear block and you are good to go! Let me know if you have any questions!
***Georgia's Birthday Special***
You might recall seeing on my blog that today is my birthday! I'd like to celebrate with you by offering you my Demonstrator discount! That means the WHOLE CATALOG is on sale at 20% off . . . GET EXCITED!!! This special is good from now until Wednesday at Noon. . . just call or e-mail me your order! There is no limit to the amount you purchase from $1 to $1,000 it's all 20% off!!! Now is the time to get out your wish list and shop!!!
Happy Shopping and thanks for stopping by my blog today!
Georgia
Stamp Fair Update!
There is still time to register for the August 14th Stamp Fair. Cost is $15 and you'll be making three cards one 3D project and a color chart. Click HERE for the details and for the first time we are going to have a GROOVY Theme for this !
The person at each session with the funnest outfit will win a prize. I'd like to encourage you to wear tie dye clothes or big floral, big jewelry, bright eye shadow, etc… You know – think 70’s. Since we all like to be creative, this ought to be a lot of fun.
Here is a picture of Shelli Gardner and her family at convention when they had the Flower Power party!

AND . . .yes there is more! We will be having a card swap again if you would like to participate. I recommend bringing 10 full cards (using Stampin' Up! products) to swap with other stampers and of course demonstrators. Some customers love this tradition. Let me know if you have any questions.
Thanks again for stopping by!
Georgia
Subscribe to:
Posts (Atom)